Here is what the right setup buys you: a clear, steady picture on screen, every time you reach into a cylinder. That is not a small thing. The whole value of an inspection rides on the quality of the images, and the quality of the images starts with the borescope and a solid connection. Get this part right once and the rest of the job — capturing the eleven views, reviewing them, comparing them over time — is built on a foundation you can trust.
Good news: connecting is meant to take seconds, not minutes. You join the borescope, open Jug Scope, and the app does the rest — it scans for the camera, connects, and puts a live picture on screen. This section covers which borescopes work well, how to connect over WiFi or USB, and what to do on the rare occasion the picture does not appear.
For owners — You only have to learn this once. A borescope you can connect to in seconds, every time, is the difference between an inspection you will actually do twice a year and one you keep putting off. Pick a recommended scope and the connection becomes a non-event.
For shops — A connection that just works is shop throughput. Every tech connects the same way to the same recommended hardware, so nobody loses a billable half-hour wrestling with a flaky camera, and the picture quality is consistent across the whole team.
3.1 Choosing a borescope
The borescope is the one piece of gear Jug Scope cannot supply, so it is worth choosing well. For a piston GA engine you want a thin, articulating probe that can reach down a spark-plug hole, bend to look at a valve, and put a sharp, well-lit image on screen. The recommendations below are the scopes the app supports and that the GA community already trusts for this work.
Recommended — Vividia VA-400 (with the VA-B2 WiFi AirBox for iOS). This is the de-facto standard for GA borescope inspections: an 8.5 mm rigid probe with full articulation, bright LED lighting, and a high-resolution picture. On its own the VA-400 connects by USB; to use it with an iPhone or iPad over WiFi, you pair it with the VA-B2 AirBox, a small WiFi box that the scope plugs into. Jug Scope speaks this combination's protocol directly, so connecting is automatic.
Also fully supported:
- Vividia W03 — the WiFi borescope Jug Scope's connection flow was originally built and tuned around; connects directly over WiFi with no separate box.
- Vividia VA-400i — a premium option that connects straight to an iPhone or iPad with a cable, no WiFi box needed.
- Teslong TD500 — a supported WiFi scope, fully working in the app.
- Depstech WF028 — a budget-friendly WiFi option that works as a secondary recommendation.
Tip — If you are buying for the first time and want the most proven setup, get a Vividia VA-400 plus the VA-B2 AirBox for WiFi, or a VA-400i if you would rather connect by cable. Either way you land on the most-used, best-supported hardware for this job. Vividia scopes are available from McFarlane Aviation, Aircraft Spruce, and Oasis Scientific.
Caution — Probe diameter matters. A standard 8.5 mm probe fits the spark-plug holes on most common GA engines, but some installations are tight. If your engine needs a thinner probe to reach a cylinder, check the borescope's diameter before you buy.
3.2 USB or WiFi: choosing how to connect
Jug Scope connects to a borescope two ways, and the better choice depends on which device you are holding.
USB-C to an iPad — the best picture, when you can use it. If you have a recent iPad and a borescope that connects by USB-C, a direct cable gives you the sharpest, lowest-lag picture there is. There is no WiFi to join and no handshake to wait through — the camera feeds straight into the iPad. This is the connection to prefer whenever it is available.
Caution — Direct USB camera connection works on iPad only. iPhones do not support external USB video cameras, so on an iPhone you will always connect over WiFi. This is an Apple hardware limitation, not a Jug Scope one.
WiFi — works on any iPhone or iPad. Most WiFi borescopes (and the VA-400 with its AirBox) create their own small WiFi network. You join that network from iOS Settings, open Jug Scope, and connect. The picture quality is excellent and the setup is portable — no cable to manage — which makes WiFi the right choice on an iPhone and a perfectly good one on an iPad.
For shops — Standardize on one connection mode across your benches and your techs stop trading tips about "the one that works." If your shop runs iPads, USB-C to the iPad is the fastest, most consistent path; if your techs work off iPhones, WiFi is the standard.
3.3 Connecting over WiFi
The goal here is simple: get the borescope's WiFi joined, then let the app find the camera and show you a live picture. Once you have done it once it takes well under a minute.
Before you start: power on the borescope and give it a few seconds to create its WiFi network.
- Join the borescope's WiFi. On the Home screen, tap the connection card (it reads No Borescope Connected when nothing is joined). From the Borescope Connection screen, tap Open WiFi Settings to jump straight to iOS Settings, then choose the borescope's network — its name usually starts with something like
WIFIimage_orWiFi_Monitor_. Enter the password if it asks (many scopes ship with a simple default printed on the device). - Return to Jug Scope. The app picks up where you left off and starts scanning automatically — you do not have to tap "connect."
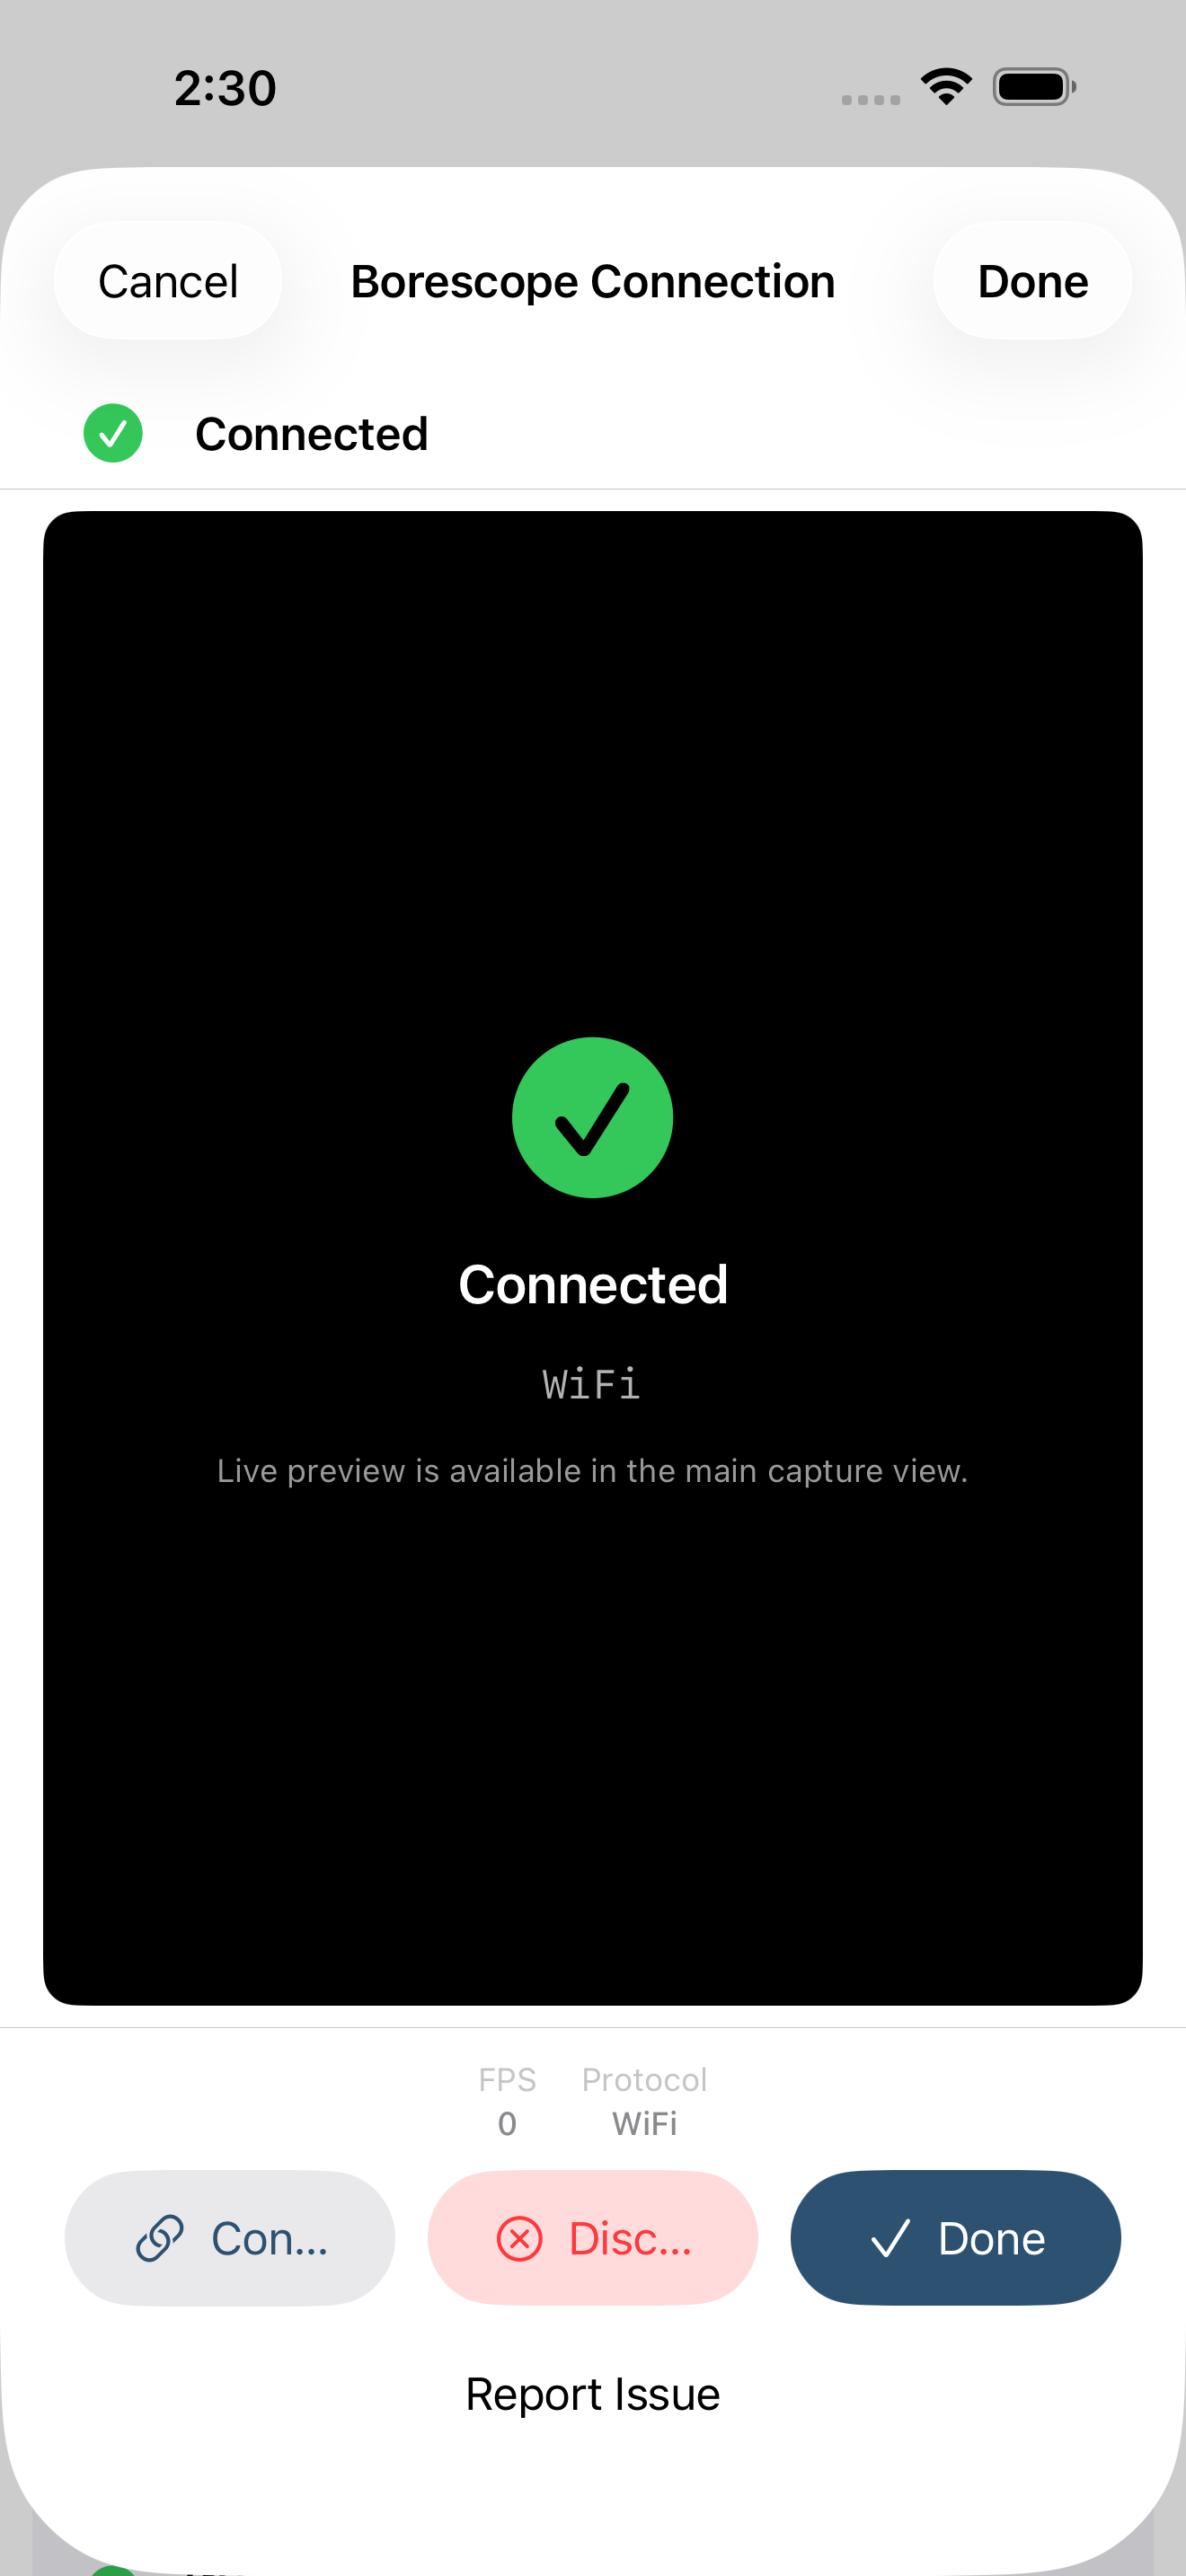
- Wait for the live picture. The status line walks you through it: Scanning… → Connecting… → Connected, and the live borescope feed fills the screen. A small readout shows the frame rate so you can see the stream is live and smooth.
- Tap Done. You are connected and ready to start (or resume) an inspection — see §4, The Inspection Workflow.
Tip — A borescope's WiFi network usually has no internet. iOS may warn you about that or try to switch you back to a network that does — tell it to stay on the borescope's network. That warning is normal and does not mean anything is wrong.
3.4 The connection screen and the live preview
The connection screen is one place that tells you everything about the link to your borescope: whether it is searching, connecting, or live, what the picture looks like right now, and how to fix it if something is off. You will spend almost no time here once you are connected — but when a connection misbehaves, this is where you sort it out.
When the app is connected, the screen shows:
- A status line at the top — Connected, with a green indicator — so you know the link is good before you trust the picture.
- The live preview, filling most of the screen, with a frame-rate badge (frames per second). A steady fps reading is your at-a-glance proof that the stream is healthy.
- Stream details — resolution, frame rate, and which borescope protocol matched — for when you want to confirm exactly what you are connected to.
- Connect, Disconnect, and Done. Done keeps the camera live and returns you to your inspection; Disconnect deliberately drops the camera; Connect starts a fresh scan if you want to reconnect or switch scopes.
Back on the Home screen, the connection card mirrors this status the whole time — green when connected (and naming your borescope model when the app recognizes it), amber while reconnecting, gray when nothing is joined — so you always know the state of the link without opening the screen.
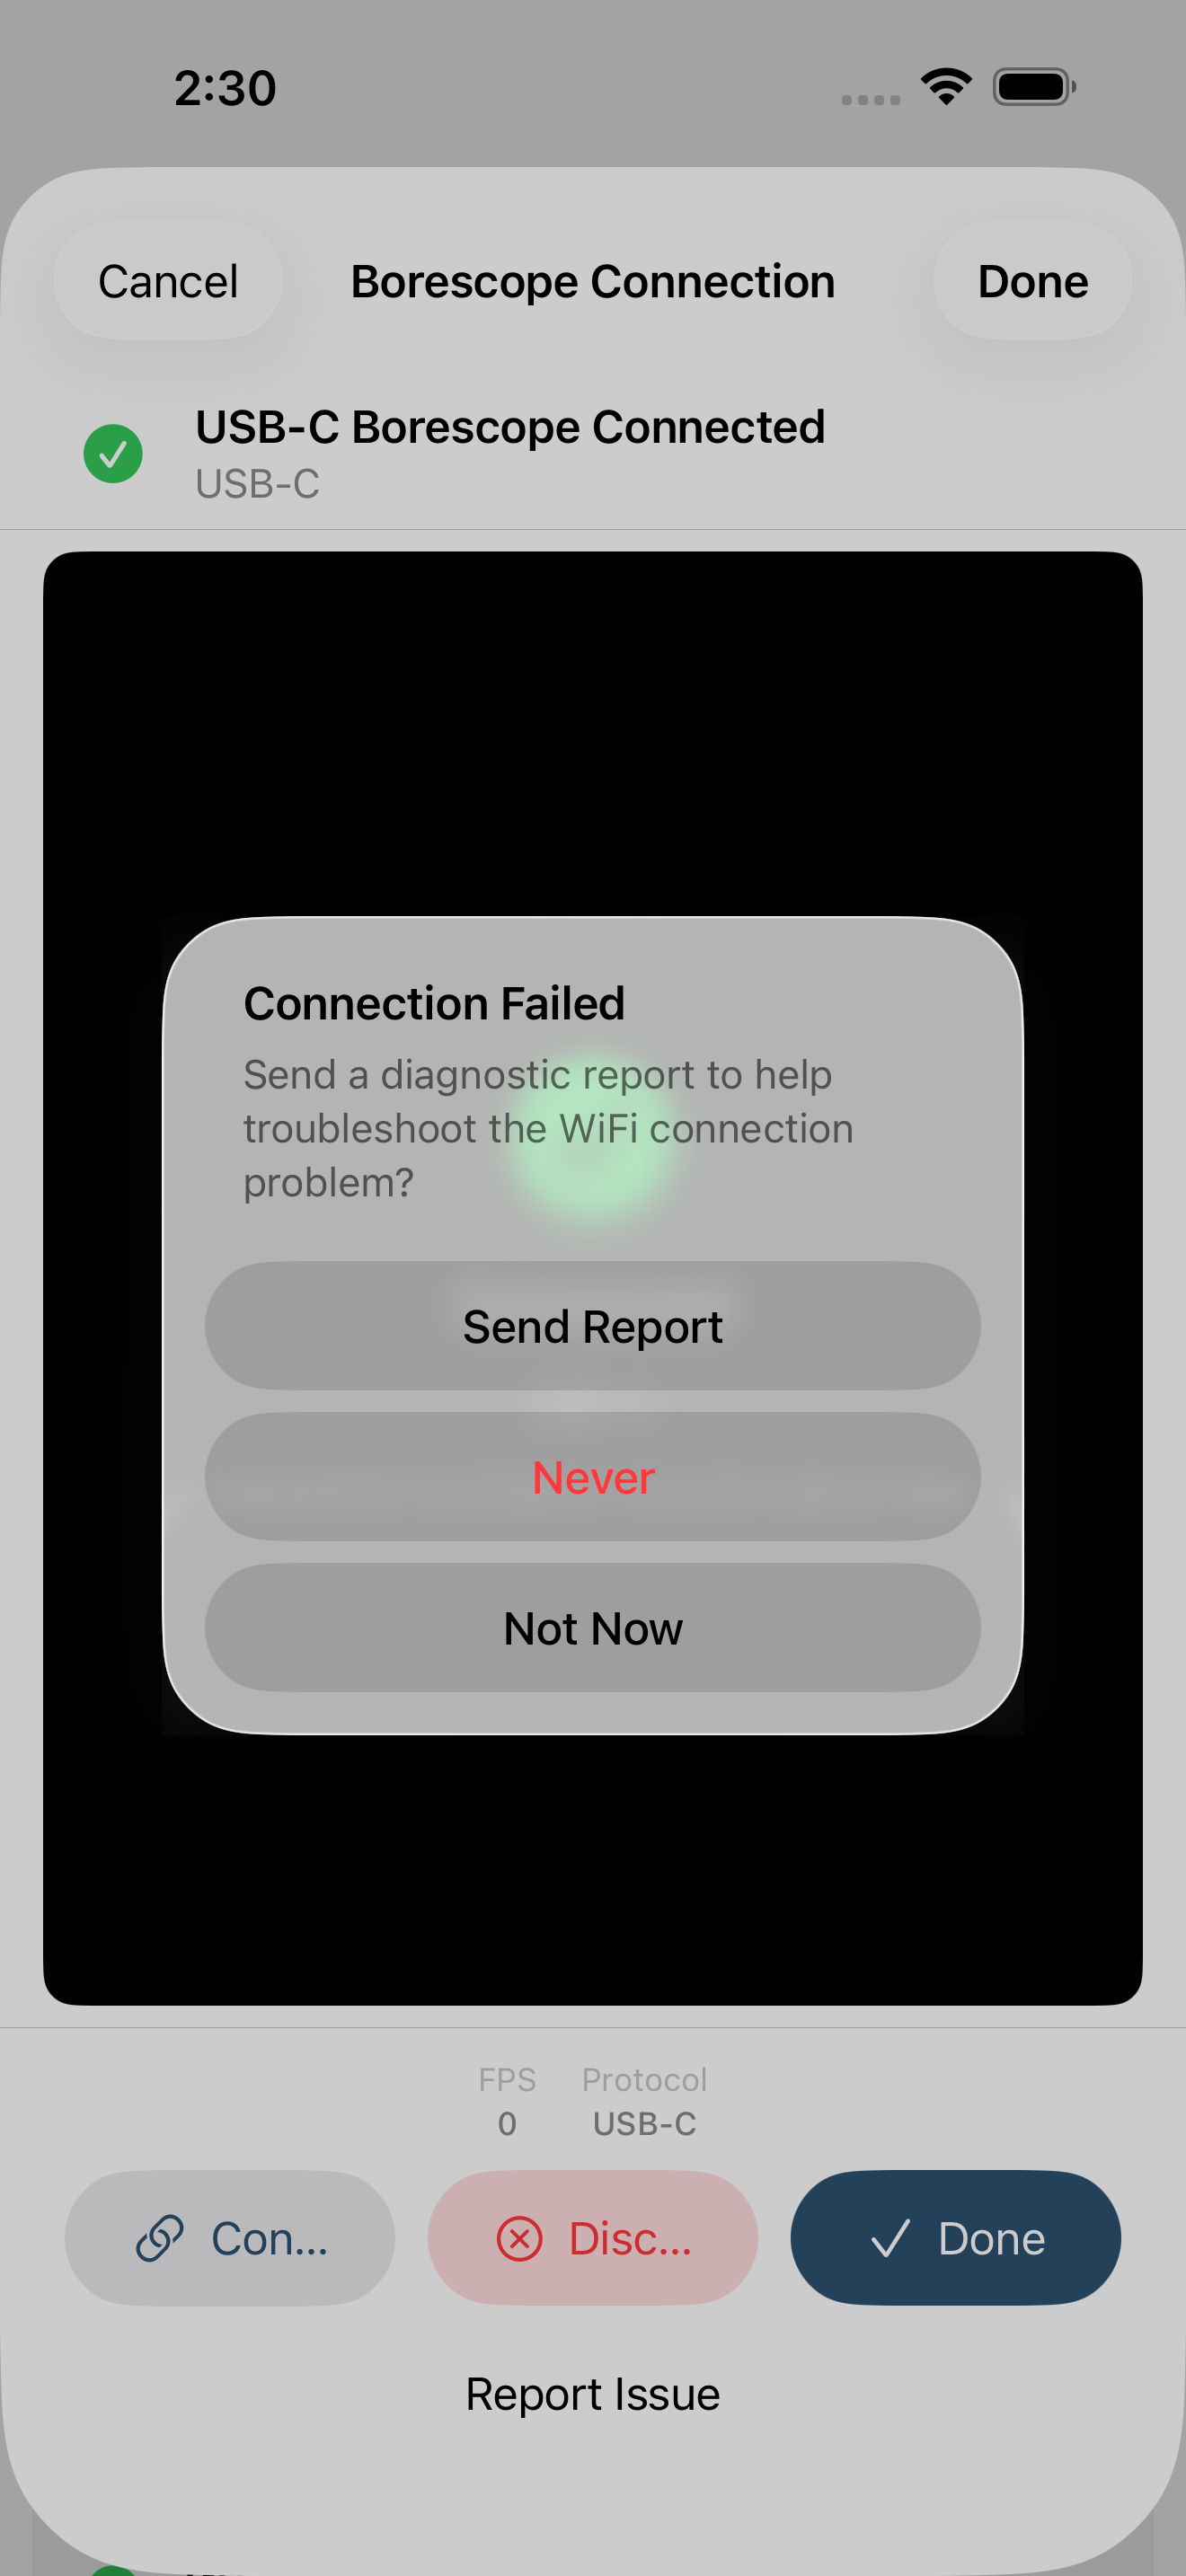
If the picture does not appear. Occasionally the camera connects but no video arrives — the screen shows Preview stream stalled. Tap Try Again to rescan; this clears the most common cause (a stream that did not start cleanly) without making you rejoin WiFi. If a scan cannot find the scope at all, the screen offers a short checklist — make sure the borescope is powered on, confirm you are on its WiFi, and move closer — plus Try Again and a one-tap Send Diagnostic Report so support can see exactly what happened.
3.5 Allowing the local-network scan
The first time Jug Scope looks for a borescope on your WiFi, iOS asks for permission to see devices on your local network. Granting it is what lets the app find and connect to the scope — without it, the app cannot reach the camera at all.
Before iOS shows its prompt, Jug Scope explains plainly what it is about to do and why: it looks only at borescope addresses, common camera connections, and nearby devices on your own WiFi to diagnose connection problems. It does not probe the public internet and does not store your image data in the scan. Tap Continue, then tap Allow on the iOS prompt that follows.
Tip — If you tapped "Don't Allow" by accident, you can turn it back on later in iOS Settings → Jug Scope → Local Network. Until it is on, scans for the borescope will come up empty.
3.6 Capturing from the borescope's button
Most of the time you will trigger each shot from the on-screen shutter, which keeps your eyes on the picture (covered in §4, Capturing a view). As a convenience, some borescope pods also have a control button on the handle that can fire the shutter without reaching for the screen. If your scope has one, you can use it; if it does not, you lose nothing — the on-screen shutter is the primary path and does everything.
3.7 Using an unsupported or unknown borescope
Jug Scope is tuned for the borescopes listed above, but the borescope market is wide and new models appear constantly. If you have a WiFi scope the app does not recognize, you are not stuck — and you can help us add it.
If a scan cannot identify your borescope, the app offers to collect a few quick details — brand, model, and the WiFi network name — and send them to us with a diagnostic report. Every one of those reports helps us add support for more hardware, so the scope that did not work today may well work in a future update. All the fields are optional; send whatever you know, or skip them entirely.
For owners — If your scope is not on the list, tell us what you have. It is the fastest way to get your specific model supported, and it costs you one short form.
During beta: All borescope connection features are fully open — there is nothing here gated behind a subscription. Connecting to your scope and getting a live picture is, and will always be, free.